Key Takeaaways
- Consistent inspections and timely maintenance prevent costly long-term structural issues.
- Choosing the correct chinking material is key to maximizing weather resistance and energy efficiency.
- Correct surface preparation and application techniques guarantee a long-lasting seal.
Table of Contents
- Introduction
- Understanding Chinking
- Choosing the Right Chinking Material
- Regular Inspections
- Cleaning and Preparing Surfaces
- Application Techniques
- Addressing Common Issues
- Seasonal Maintenance Tips
- When to Seek Professional Help
Introduction
Chinking is critical to any log home’s longevity, energy efficiency, and comfort. It is a resilient barrier that prevents air leaks, moisture penetration, and pest infestations. Homeowners seeking to preserve their log homes should understand the importance of diligent chinking maintenance, from regular inspections to timely repairs and upgrades. For those dealing with repairs or upgrades, synthetic chinking repair services offer a reliable, long-term solution that protects your investment and ensures optimal performance season after season.
Whether you’re a new log home owner or an experienced caretaker, proper chinking maintenance can significantly extend the life of your home’s exterior and interior. By monitoring and addressing chinking issues, you can avoid costly repairs, reduce drafts, and preserve your log structure’s rustic beauty and function. Knowing when to choose modern synthetic materials, how to apply chinking correctly, and when to call in experts are the foundations of any successful maintenance plan.
Understanding Chinking
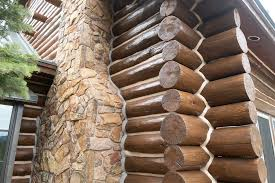
Chinking refers to the visible material applied between the logs of a log home to seal wide gaps or joints. Its primary function is to block air, moisture, and insects from entering while providing insulation and aesthetic appeal. Historically, a blend of clay, sand, and lime provided these benefits. Still, the demands of modern housing have led to the development of synthetic chinking that is both more flexible and durable. Synthetic chinking can expand and contract with the logs’ movement due to weather changes or settling, reducing the incidence of cracks and gaps over time.
Understanding the characteristics and expectations of different chinking materials is essential for ongoing maintenance. Homeowners today can benefit from product innovations that offer improved adhesion, UV resistance, and longevity, reducing the frequency of repairs and improving the home’s overall efficiency.
Choosing the Right Chinking Material
Selecting the best chinking material involves balancing climate, log movement, and gap size. Modern acrylic-based and elastomeric synthetic chinking is highly recommended due to its flexibility, durability, and ease of use. For smaller gaps (less than ¾ inch), caulks or sealants are suitable, but anything larger requires robust chinking. Incorporating backer rods—foam rods inserted in deeper or wider joints—creates a proper substrate for chinking to adhere to and stretch, ensuring the seal lasts longer even as logs expand and contract. This selection process is crucial for preventing energy losses and moisture entry, two major contributors to structural deterioration in log homes. For more insights, visit the Log Home Guide to Chinking.
Regular Inspections
Routine chinking inspections should be a staple of every log home care plan. Homeowners should look for visible cracks, pulled-away or separated areas, discoloration, mold, or soft spots. Ideally, these checks should occur at least twice a year, in spring and fall, as drastic temperature swings often exacerbate underlying chinking weaknesses. Early detection and remediation of minor problems can prevent major air leaks, pest entry, and water infiltration, leading to severe log home damage if left unaddressed. Major home improvement sites like Log Home Inspection Guide offer additional inspection tips for log structures.
Cleaning and Preparing Surfaces
Proper adhesion and longevity of chinking depend on meticulous surface preparation. Start by brushing away loose debris, dust, and pollen with a medium-bristle brush. Use a log-home-specific cleaner or mild chemical solution to remove stubborn contaminants, following up with a thorough rinse. Let the logs dry fully, as moisture trapped between the log and chinking can cause premature failure and rot. In areas prone to fungal issues, applying a borate-based preservative protects the wood and extends the life of the logs and the chinking. This critical step ensures strong adherence and safeguards the home against hidden deterioration.
Application Techniques
Step-by-Step Chinking Application
- Insert an appropriately sized backer rod into the joint. This sets the ideal joint depth (usually 3/8 to 1/2 inch for chinking) and ensures that chinking adheres to the sides of the logs, allowing for necessary movement.
- Using a caulk gun and trowel, apply chinking over and across the backer rod in an even, continuous fashion, ensuring the material is pressed solidly against both logs for maximum adhesion.
- Smooth the chinking surface with a wet spatula or trowel to eliminate gaps, create an aesthetic finish, and ensure a weather-tight seal.
- Allow the chinking to cure fully, per the manufacturer’s directions, before exposing it to rain, direct sunlight, or cold temperatures to prevent defects such as cracking or blistering.
Addressing Common Issues
Despite best efforts, chinking occasionally faces challenges like cracking, separation, or blistering. Address minor damage by carefully removing failed sections, cleaning thoroughly, and reapplying new material using proper technique. Avoid common pitfalls like puncturing the backer rod (which can cause blisters due to trapped air or moisture). Apply chinking in the shade to combat blistering and protect from direct sun and heavy wind during curing. Localized repairs handled promptly can prevent the problem from spreading and compromising entire wall sections.
Seasonal Maintenance Tips
Spring and fall bring freeze-thaw cycles and dramatic shifts in humidity, which are tough on log home chinking. To keep surface pollutants in check, inspect the home’s perimeter, check for gaps or soft spots, and clean the exterior at least once a year. During summer, protect freshly applied chinking from drying too quickly, and during winter, be vigilant for ice buildup near joints. Monitoring these seasonal changes and performing timely touch-ups will extend the chinking’s life and maintain the home’s energy efficiency.
When to Seek Professional Help
While attentive homeowners can manage most routine chinking maintenance, extensive gaps, widespread cracking, or persistent water or air intrusion require professional expertise. Qualified log home repair specialists can evaluate underlying structural issues, recommend synthetic products, and complete large-scale repairs that withstand weather and time. Don’t hesitate to consult a pro if you encounter conditions you cannot diagnose or repair safely.
Committing to proactive chinking maintenance will keep your log home warm, dry, and structurally sound. Following these best practices and utilizing expert guidance and proven modern materials will ensure your home’s enduring beauty and comfort for many years.